.net Core Read Request Header for User Roles From Sso
This browser is no longer supported.
Upgrade to Microsoft Edge to have reward of the latest features, security updates, and technical support.
Role-Based Dominance (C#)
by Scott Mitchell
Download Code or Download PDF
This tutorial starts with a look at how the Roles framework associates a user's roles with his security context. It and so examines how to apply role-based URL authority rules. Following that, we will wait at using declarative and programmatic means for altering the data displayed and the functionality offered by an ASP.Cyberspace folio.
Introduction
In the User-Based Say-so tutorial nosotros saw how to use URL authorization to specify what users could visit a particular prepare of pages. With but a piddling bit of markup in Web.config, we could instruct ASP.NET to allow but authenticated users to visit a folio. Or we could dictate that simply users Tito and Bob were allowed, or betoken that all authenticated users except for Sam were permitted.
In addition to URL dominance, we also looked at declarative and programmatic techniques for controlling the data displayed and the functionality offered by a folio based on the user visiting. In item, nosotros created a page that listed the contents of the current directory. Anyone could visit this folio, but merely authenticated users could view the files' contents and only Tito could delete the files.
Applying authorization rules on a user-past-user footing tin can grow into a accounting nightmare. A more maintainable approach is to apply role-based authorization. The skillful news is that the tools at our disposal for applying authorization rules work every bit well with roles equally they practise for user accounts. URL authority rules can specify roles instead of users. The LoginView command, which renders dissimilar output for authenticated and anonymous users, can exist configured to display dissimilar content based on the logged in user's roles. And the Roles API includes methods for determining the logged in user's roles.
This tutorial starts with a await at how the Roles framework associates a user's roles with his security context. It and then examines how to use role-based URL authorization rules. Following that, we will look at using declarative and programmatic means for altering the data displayed and the functionality offered past an ASP.Internet folio. Let'due south get started!
Understanding How Roles are Associated with a User'south Security Context
Whenever a asking enters the ASP.NET pipeline it is associated with a security context, which includes information identifying the requestor. When using forms authentication, an authentication ticket is used every bit an identity token. Every bit we discussed in the An Overview of Forms Hallmark tutorial, the FormsAuthenticationModule is responsible for determining the identity of the requestor, which information technology does during the AuthenticateRequest event.
If a valid, non-expired hallmark ticket is found, the FormsAuthenticationModule decodes it to ascertain the requestor'southward identity. It creates a new GenericPrincipal object and assigns this to the HttpContext.User object. The purpose of a primary, like GenericPrincipal, is to identify the authenticated user's name and what roles she belong to. This purpose is evident by the fact that all principal objects have an Identity property and an IsInRole(roleName) method. The FormsAuthenticationModule, however, is non interested in recording role information and the GenericPrincipal object it creates does non specify any roles.
If the Roles framework is enabled, the RoleManagerModule HTTP Module steps in after the FormsAuthenticationModule and identifies the authenticated user's roles during the PostAuthenticateRequest event, which fires subsequently the AuthenticateRequest upshot. If the request is from an authenticated user, the RoleManagerModule overwrites the GenericPrincipal object created by the FormsAuthenticationModule and replaces it with a RolePrincipal object. The RolePrincipal class uses the Roles API to determine what roles the user belongs to.
Figure 1 depicts the ASP.NET pipeline workflow when using forms authentication and the Roles framework. The FormsAuthenticationModule executes commencement, identifies the user via her hallmark ticket, and creates a new GenericPrincipal object. Next, the RoleManagerModule steps in and overwrites the GenericPrincipal object with a RolePrincipal object.
If an anonymous user visits the site, neither the FormsAuthenticationModule nor the RoleManagerModule creates a principal object.

Figure one: The ASP.NET Pipeline Events for an Authenticated User When Using Forms Authentication and the Roles Framework (Click to view full-size epitome)
Caching Function Information in a Cookie
The RolePrincipal object'south IsInRole(roleName) method calls Roles.GetRolesForUser to get the roles for the user in order to determine whether the user is a member of roleName. When using the SqlRoleProvider, this results in a query to the role store database. When using role-based URL authorization rules the RolePrincipal'due south IsInRole method volition be called on every asking to a page that is protected by the role-based URL authorization rules. Rather than have to lookup the role information in the database on every request, the Roles framework includes an option to cache the user's roles in a cookie.
If the Roles framework is configured to cache the user's roles in a cookie, the RoleManagerModule creates the cookie during the ASP.NET pipeline's EndRequest event. This cookie is used in subsequent requests in the PostAuthenticateRequest, which is when the RolePrincipal object is created. If the cookie is valid and has not expired, the information in the cookie is parsed and used to populate the user's roles, thereby saving the RolePrincipal from having to make a call to the Roles class to decide the user's roles. Figure 2 depicts this workflow.

Figure 2: The User's Role Data Tin can Be Stored in a Cookie to Amend Performance (Click to view total-size epitome)
By default, the part enshroud cookie mechanism is disabled. It tin be enabled through the <roleManager> configuration markup in Web.config. We discussed using the <roleManager> chemical element to specify Role providers in the Creating and Managing Roles tutorial, and so y'all should already have this chemical element in your application's Spider web.config file. The role cache cookie settings are specified equally attributes of the <roleManager> element, and are summarized in Tabular array 1.
Annotation
The configuration settings listed in Table 1 specify the backdrop of the resulting function cache cookie. For more data on cookies, how they work, and their various properties, read this Cookies tutorial.
| Holding | Description |
|---|---|
cacheRolesInCookie | A Boolean value that indicates whether cookie caching is used. Defaults to faux. |
cookieName | The name of the function cache cookie. The default value is ".ASPXROLES". |
cookiePath | The path for the roles proper name cookie. The path attribute enables a developer to limit the scope of a cookie to a item directory hierarchy. The default value is "/", which informs the browser to ship the authentication ticket cookie to any request fabricated to the domain. |
cookieProtection | Indicates what techniques are used to protect the role cache cookie. The allowable values are: All (the default); Encryption; None; and Validation. |
cookieRequireSSL | A Boolean value that indicates whether an SSL connection is required to transmit the authentication cookie. The default value is faux. |
cookieSlidingExpiration | A Boolean value that indicates whether the cookie'southward timeout is reset each fourth dimension the user visits the site during a single session. The default value is false. This value is only pertinent when createPersistentCookie is set to true. |
cookieTimeout | Specifies the time, in minutes, later on which the hallmark ticket cookie expires. The default value is thirty. This value is simply pertinent when createPersistentCookie is set to true. |
createPersistentCookie | A Boolean value that specifies whether the role cache cookie is a session cookie or persistent cookie. If false (the default), a session cookie is used, which is deleted when the browser is closed. If true, a persistent cookie is used; it expires cookieTimeout number of minutes after it has been created or later on the previous visit, depending on the value of cookieSlidingExpiration. |
domain | Specifies the cookie'due south domain value. The default value is an empty string, which causes the browser to use the domain from which it was issued (such as www.yourdomain.com). In this instance, the cookie will non exist sent when making requests to subdomains, such equally admin.yourdomain.com. If you want the cookie to exist passed to all subdomains you demand to customize the domain attribute, setting information technology to "yourdomain.com". |
maxCachedResults | Specifies the maximum number of part names that are buried in the cookie. The default is 25. The RoleManagerModule does not create a cookie for users that belong to more than maxCachedResults roles. Consequently, the RolePrincipal object's IsInRole method volition use the Roles class to make up one's mind the user's roles. The reason maxCachedResults exists is because many user agents exercise not permit cookies larger than 4,096 bytes. And then this cap is meant to reduce the likelihood of exceeding this size limitation. If you have extremely long role names, you may desire to consider specifying a smaller maxCachedResults value; contrariwise, if you have extremely short part names, you can probably increase this value. |
Table 1: The Role Enshroud Cookie Configuration Options
Let's configure our application to utilize not-persistent role cache cookies. To accomplish this, update the <roleManager> element in Web.config to include the following cookie-related attributes:
<roleManager enabled="true" defaultProvider="SecurityTutorialsSqlRoleProvider" cacheRolesInCookie="true" createPersistentCookie="simulated" cookieProtection="All"> <providers> ... </providers> </roleManager> I updated the <roleManager> element past adding three attributes: cacheRolesInCookie, createPersistentCookie, and cookieProtection. By setting cacheRolesInCookie to truthful, the RoleManagerModule will now automatically enshroud the user'southward roles in a cookie rather than having to lookup the user's role information on each asking. I explicitly set the createPersistentCookie and cookieProtection attributes to faux and All, respectively. Technically, I didn't need to specify values for these attributes since I only assigned them to their default values, but I put them here to make it explicitly clear that I am non using persistent cookies and that the cookie is both encrypted and validated.
That'due south all there is to it! Henceforth, the Roles framework will cache the users' roles in cookies. If the user'due south browser does not support cookies, or if their cookies are deleted or lost, somehow, it's no big deal – the RolePrincipal object volition but use the Roles class in the case that no cookie (or an invalid or expired one) is available.
Notation
Microsoft's Patterns & Practices group discourages using persistent part enshroud cookies. Since possession of the office cache cookie is sufficient to show part membership, if a hacker can somehow proceeds access to a valid user'southward cookie he can impersonate that user. The likelihood of this happening increases if the cookie is persisted on the user'south browser. For more information on this security recommendation, besides as other security concerns, refer to the Security Question List for ASP.Cyberspace 2.0.
Step ane: Defining Role-Based URL Authorization Rules
As discussed in the User-Based Authorization tutorial, URL potency offers a means to restrict admission to a set of pages on a user-past-user or part-by-part ground. The URL authorization rules are spelled out in Web.config using the <authorization> element with <allow> and <deny> child elements. In add-on to the user-related authorization rules discussed in previous tutorials, each <allow> and <deny> kid chemical element tin can likewise include:
- A item function
- A comma-delimited listing of roles
For example, the URL authorization rules grant access to those users in the Administrators and Supervisors roles, but deny access to all others:
<authorization> <allow roles="Administrators, Supervisors" /> <deny users="*" /> </authorisation> The <permit> element in the above markup states that the Administrators and Supervisors roles are immune; the <deny> element instructs that all users are denied.
Let'due south configure our application so that the ManageRoles.aspx, UsersAndRoles.aspx, and CreateUserWizardWithRoles.aspx pages are only accessible to those users in the Administrators role, while the RoleBasedAuthorization.aspx folio remains attainable to all visitors.
To accomplish this, start by calculation a Spider web.config file to the Roles folder.
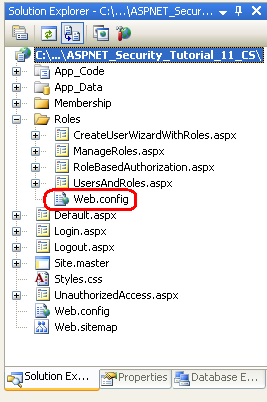
Figure 3: Add a Web.config File to the Roles directory (Click to view total-size image)
Next, add the post-obit configuration markup to Web.config:
<?xml version="1.0"?> <configuration> <system.web> <authorization> <permit roles="Administrators" /> <deny users="*"/> </authorization> </arrangement.web> <!-- Permit all users to visit RoleBasedAuthorization.aspx --> <location path="RoleBasedAuthorization.aspx"> <system.web> <authorization> <allow users="*" /> </authorization> </organisation.web> </location> </configuration> The <authorization> element in the <system.web> section indicates that only users in the Administrators role may access the ASP.Cyberspace resources in the Roles directory. The <location> element defines an alternate set of URL authorization rules for the RoleBasedAuthorization.aspx page, allowing all users to visit the page.
After saving your changes to Web.config, log in as a user that is not in the Administrators role and then attempt to visit i of the protected pages. The UrlAuthorizationModule will detect that you do not take permission to visit the requested resource; consequently, the FormsAuthenticationModule volition redirect you to the login page. The login folio volition and so redirect yous to the UnauthorizedAccess.aspx page (see Figure four). This final redirect from the login page to UnauthorizedAccess.aspx occurs considering of code nosotros added to the login page in Pace ii of the User-Based Dominance tutorial. In particular, the login page automatically redirects whatever authenticated user to UnauthorizedAccess.aspx if the querystring contains a ReturnUrl parameter, as this parameter indicates that the user arrived at the login page after attempting to view a page he was non authorized to view.
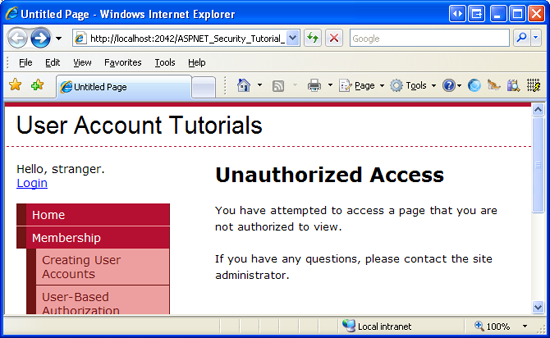
Effigy 4: Only Users in the Administrators Role Tin View the Protected Pages (Click to view total-size image)
Log off so log in as a user that is in the Administrators role. Now you should be able to view the three protected pages.

Effigy v: Tito Can Visit the UsersAndRoles.aspx Page Because He is in the Administrators Role (Click to view full-size image)
Note
When specifying URL authority rules – for roles or users – it is important to proceed in mind that the rules are analyzed one at a fourth dimension, from the top down. Equally soon equally a friction match is found, the user is granted or denied access, depending on if the match was found in an <permit> or <deny> chemical element. If no match is establish, the user is granted access. Consequently, if you want to restrict access to i or more user accounts, it is imperative that you lot use a <deny> chemical element as the last element in the URL say-so configuration. If your URL authorization rules do not include a <deny> element, all users volition be granted access. For a more thorough discussion on how the URL authorization rules are analyzed, refer dorsum to the "A Expect at How the UrlAuthorizationModule Uses the Authority Rules to Grant or Deny Access" department of the User-Based Authorization tutorial.
Stride ii: Limiting Functionality Based On the Currently Logged In User's Roles
URL dominance makes it easy to specify coarse authorization rules that state what identities are permitted and which ones are denied from viewing a particular page (or all pages in a folder and its subfolders). However, in certain cases we may desire to permit all users to visit a page, just limit the page's functionality based on the visiting user'due south roles. This may entail showing or hiding data based on the user's function, or offering boosted functionality to users that belong to a item part.
Such fine grain role-based authorisation rules can be implemented either declaratively or programmatically (or through some combination of the two). In the next section we will see how to implement declarative fine grain authorization via the LoginView control. Following that, we volition explore programmatic techniques. Before nosotros tin can await at applying fine grain dominance rules, even so, we first need to create a page whose functionality depends on the role of the user visiting it.
Let'southward create a page that lists all of the user accounts in the system in a GridView. The GridView volition include each user'south username, email accost, last login date, and comments almost the user. In addition to displaying each user'due south data, the GridView will include edit and delete capabilities. Nosotros volition initially create this page with the edit and delete functionality bachelor to all users. In the "Using the LoginView Control" and "Programmatically Limiting Functionality" sections we will see how to enable or disable these features based on the visiting user'south role.
Note
The ASP.NET folio we are about to build uses a GridView command to display the user accounts. Since this tutorial series focuses on forms authentication, authorization, user accounts, and roles, I do non desire to spend too much time discussing the inner workings of the GridView control. While this tutorial provides specific step-by-pace instructions for setting up this page, it does not delve into the details of why certain choices were made, or what effect particular properties have on the rendered output. For a thorough examination of the GridView control, check out my Working with Information in ASP.Internet 2.0 tutorial series.
Start past opening the RoleBasedAuthorization.aspx page in the Roles binder. Elevate a GridView from the page onto the Designer and ready its ID to UserGrid. In a moment we will write code that calls the Membership.GetAllUsers method and binds the resulting MembershipUserCollection object to the GridView. The MembershipUserCollection contains a MembershipUser object for each user account in the system; MembershipUser objects have properties like UserName, Email, LastLoginDate, and and then along.
Earlier we write the code that binds the user accounts to the grid, allow'southward first define the GridView's fields. From the GridView'southward Smart Tag, click the "Edit Columns" link to launch the Fields dialog box (see Figure six). From here, uncheck the "Automobile-generate fields" checkbox in the lower left corner. Since we want this GridView to include editing and deleting capabilities, add a CommandField and set its ShowEditButton and ShowDeleteButton backdrop to True. Next, add four fields for displaying the UserName, Email, LastLoginDate, and Annotate properties. Employ a BoundField for the 2 read-just properties (UserName and LastLoginDate) and TemplateFields for the two editable fields (Electronic mail and Comment).
Have the first BoundField brandish the UserName property; fix its HeaderText and DataField properties to "UserName". This field will not be editable, and then set its ReadOnly property to True. Configure the LastLoginDate BoundField past setting its HeaderText to "Final Login" and its DataField to "LastLoginDate". Permit's format the output of this BoundField so that just the date is displayed (instead of the appointment and time). To attain this, set this BoundField's HtmlEncode property to Fake and its DataFormatString holding to "{0:d}". Also prepare the ReadOnly property to True.
Set the HeaderText backdrop of the ii TemplateFields to "E-mail" and "Comment".

Figure six: The GridView's Fields Tin Be Configured Through the Fields Dialog Box (Click to view full-size prototype)
We now need to define the ItemTemplate and EditItemTemplate for the "Email" and "Comment" TemplateFields. Add a Label Web command to each of the ItemTemplate due south and bind their Text properties to the Email and Comment properties, respectively.
For the "Email" TemplateField, add a TextBox named Email to its EditItemTemplate and demark its Text belongings to the E-mail property using 2-manner databinding. Add together a RequiredFieldValidator and RegularExpressionValidator to the EditItemTemplate to ensure that a visitor editing the Electronic mail property has entered a valid email address. For the "Comment" TemplateField, add a multi-line TextBox named Comment to its EditItemTemplate. Set the TextBox's Columns and Rows properties to forty and 4, respectively, and so bind its Text property to the Comment holding using two-way databinding.
After configuring these TemplateFields, their declarative markup should look similar to the following:
<asp:TemplateField HeaderText="Email"> <ItemTemplate> <asp:Label runat="server" ID="Label1" Text='<%# Eval("Email") %>'></asp:Label> </ItemTemplate> <EditItemTemplate> <asp:TextBox runat="server" ID="Email" Text='<%# Bind("Email") %>'></asp:TextBox> <asp:RequiredFieldValidator ID="RequiredFieldValidator1" runat="server" ControlToValidate="Email" Display="Dynamic" ErrorMessage="You must provide an email accost." SetFocusOnError="True">*</asp:RequiredFieldValidator> <asp:RegularExpressionValidator ID="RegularExpressionValidator1" runat="server" ControlToValidate="Email" Display="Dynamic" ErrorMessage="The e-mail address you have entered is not valid. Please set this and try again." SetFocusOnError="Truthful" ValidationExpression="\w+([-+.']\w+)*@\w+([-.]\westward+)*\.\w+([-.]\westward+)*">* </asp:RegularExpressionValidator> </EditItemTemplate> </asp:TemplateField> <asp:TemplateField HeaderText="Comment"> <ItemTemplate> <asp:Label runat="server" ID="Label2" Text='<%# Eval("Comment") %>'></asp:Label> </ItemTemplate> <EditItemTemplate> <asp:TextBox runat="server" ID="Comment" TextMode="MultiLine" Columns="xl" Rows="iv" Text='<%# Bind("Comment") %>'> </asp:TextBox> </EditItemTemplate> </asp:TemplateField> When editing or deleting a user business relationship we will need to know that user'south UserName belongings value. Set the GridView'south DataKeyNames belongings to "UserName" so that this information is available through the GridView's DataKeys drove.
Finally, add a ValidationSummary control to the folio and fix its ShowMessageBox property to Truthful and its ShowSummary property to False. With these settings, the ValidationSummary volition display a client-side alert if the user attempts to edit a user business relationship with a missing or invalid email accost.
<asp:ValidationSummary ID="ValidationSummary1" runat="server" ShowMessageBox="Truthful" ShowSummary="False" /> Nosotros accept at present completed this folio's declarative markup. Our next task is to demark the set of user accounts to the GridView. Add a method named BindUserGrid to the RoleBasedAuthorization.aspx page's code-behind class that binds the MembershipUserCollection returned by Membership.GetAllUsers to the UserGrid GridView. Phone call this method from the Page_Load event handler on the first page visit.
protected void Page_Load(object sender, EventArgs e) { if (!Folio.IsPostBack) BindUserGrid(); } individual void BindUserGrid() { MembershipUserCollection allUsers = Membership.GetAllUsers(); UserGrid.DataSource = allUsers; UserGrid.DataBind(); } With this lawmaking in place, visit the page through a browser. As Figure 7 shows, yous should see a GridView listing information nigh each user business relationship in the organisation.

Figure 7: The UserGrid GridView Lists Information About Each User in the Organisation (Click to view full-size image)
Note
The UserGrid GridView lists all of the users in a non-paged interface. This simple grid interface is not suitable for scenarios where in that location are several dozen or more users. 1 option is to configure the GridView to enable paging. The Membership.GetAllUsers method has 2 overloads: one that accepts no input parameters and returns all of the users and i that takes in integer values for the folio index and folio size, and returns merely the specified subset of the users. The second overload can exist used to more than efficiently folio through the users since information technology returns just the precise subset of user accounts rather than all of them. If you take thousands of user accounts, you might want to consider a filter-based interface, one that simply shows those users whose UserName begins with a selected grapheme, for instance. The Membership.FindUsersByName method is ideal for building a filter-based user interface. We volition look at edifice such an interface in a future tutorial.
The GridView control offers built-in editing and deleting support when the control is jump to a properly configured information source control, such equally the SqlDataSource or ObjectDataSource. The UserGrid GridView, however, has its data programmatically bound; therefore, we must write code to perform these 2 tasks. In item, we volition demand to create consequence handlers for the GridView'southward RowEditing, RowCancelingEdit, RowUpdating, and RowDeleting events, which are fired when a visitor clicks the GridView's Edit, Cancel, Update, or Delete buttons.
Offset by creating the effect handlers for the GridView's RowEditing, RowCancelingEdit, and RowUpdating events and and so add the post-obit code:
protected void UserGrid_RowEditing(object sender, GridViewEditEventArgs due east) { // Set the grid's EditIndex and rebind the data UserGrid.EditIndex = e.NewEditIndex; BindUserGrid(); } protected void UserGrid_RowCancelingEdit(object sender, GridViewCancelEditEventArgs due east) { // Revert the filigree's EditIndex to -1 and rebind the data UserGrid.EditIndex = -1; BindUserGrid(); } protected void UserGrid_RowUpdating(object sender, GridViewUpdateEventArgs e) { // Exit if the page is not valid if (!Page.IsValid) return; // Determine the username of the user nosotros are editing string UserName = UserGrid.DataKeys[eastward.RowIndex].Value.ToString(); // Read in the entered information and update the user TextBox EmailTextBox = UserGrid.Rows[e.RowIndex].FindControl("Email") equally TextBox; TextBox CommentTextBox = UserGrid.Rows[e.RowIndex].FindControl("Comment") every bit TextBox; // Return data about the user MembershipUser UserInfo = Membership.GetUser(UserName); // Update the User business relationship data UserInfo.Electronic mail = EmailTextBox.Text.Trim(); UserInfo.Comment = CommentTextBox.Text.Trim(); Membership.UpdateUser(UserInfo); // Revert the grid's EditIndex to -1 and rebind the data UserGrid.EditIndex = -ane; BindUserGrid(); } The RowEditing and RowCancelingEdit event handlers simply prepare the GridView'southward EditIndex property and so rebind the list of user accounts to the filigree. The interesting stuff happens in the RowUpdating consequence handler. This result handler starts past ensuring that the data is valid and then grabs the UserName value of the edited user business relationship from the DataKeys drove. The Electronic mail and Annotate TextBoxes in the two TemplateFields' EditItemTemplate due south are then programmatically referenced. Their Text properties incorporate the edited e-mail address and comment.
In order to update a user account through the Membership API we need to kickoff get the user's information, which we practise via a call to Membership.GetUser(userName). The returned MembershipUser object'due south Email and Comment properties are and so updated with the values entered into the two TextBoxes from the editing interface. Finally, these modifications are saved with a phone call to Membership.UpdateUser. The RowUpdating event handler completes by reverting the GridView to its pre-editing interface.
Next, create the RowDeleting outcome handler and then add together the following code:
protected void UserGrid_RowDeleting(object sender, GridViewDeleteEventArgs eastward) { // Decide the username of the user we are editing string UserName = UserGrid.DataKeys[e.RowIndex].Value.ToString(); // Delete the user Membership.DeleteUser(UserName); // Revert the grid's EditIndex to -1 and rebind the data UserGrid.EditIndex = -1; BindUserGrid(); } The to a higher place result handler starts by grabbing the UserName value from the GridView's DataKeys collection; this UserName value is then passed into the Membership course's DeleteUser method. The DeleteUser method deletes the user account from the system, including related membership data (such as what roles this user belongs to). Later deleting the user, the grid's EditIndex is set to -1 (in case the user clicked Delete while another row was in edit mode) and the BindUserGrid method is chosen.
Note
The Delete push button does not require any sort of confirmation from the user before deleting the user account. I encourage you to add together some form of user confirmation to lessen the take a chance of an account existence accidentally deleted. One of the easiest means to confirm an activeness is through a client-side confirm dialog box. For more information on this technique, see Adding Client-Side Confirmation When Deleting.
Verify that this page functions as expected. Y'all should exist able to edit whatever user's email address and annotate, also as delete any user account. Since the RoleBasedAuthorization.aspx page is attainable to all users, any user – even bearding visitors – tin visit this folio and edit and delete user accounts! Let'south update this page so that only users in the Supervisors and Administrators roles can edit a user's electronic mail accost and comment, and only Administrators tin can delete a user account.
The "Using the LoginView Control" section looks at using the LoginView command to show instructions specific to the user's role. If a person in the Administrators part visits this page, we will show instructions on how to edit and delete users. If a user in the Supervisors role reaches this page, we volition show instructions on editing users. And if the visitor is anonymous or is not in either the Supervisors or Administrators part, we will display a message explaining that they cannot edit or delete user account information. In the "Programmatically Limiting Functionality" section we will write code that programmatically shows or hides the Edit and Delete buttons based on the user'due south role.
Using the LoginView Command
As nosotros've seen in past tutorials, the LoginView control is useful for displaying dissimilar interfaces for authenticated and anonymous users, just the LoginView command tin too be used to display dissimilar markup based on the user's roles. Let's use a LoginView control to display different instructions based on the visiting user's role.
Starting time by adding a LoginView above the UserGrid GridView. As we've discussed earlier, the LoginView control has two built-in templates: AnonymousTemplate and LoggedInTemplate. Enter a brief message in both of these templates that informs the user that they cannot edit or delete any user information.
<asp:LoginView ID="LoginView1" runat="server"> <LoggedInTemplate> Y'all are not a member of the Supervisors or Administrators roles. Therefore you cannot edit or delete whatsoever user data. </LoggedInTemplate> <AnonymousTemplate> Yous are not logged into the system. Therefore y'all cannot edit or delete any user information. </AnonymousTemplate> </asp:LoginView> In addition to the AnonymousTemplate and LoggedInTemplate, the LoginView control can include RoleGroups, which are role-specific templates. Each RoleGroup contains a unmarried property, Roles, which specifies what roles the RoleGroup applies to. The Roles property tin can exist gear up to a single office (like "Administrators") or to a comma-delimited list of roles (like "Administrators, Supervisors").
To manage the RoleGroups, click the "Edit RoleGroups" link from the control'south Smart Tag to bring up the RoleGroup Collection Editor. Add together two new RoleGroups. Set the first RoleGroup'south Roles property to "Administrators" and the second'due south to "Supervisors".

Figure 8: Manage the LoginView's Role-Specific Templates Through the RoleGroup Drove Editor (Click to view full-size image)
Click OK to close the RoleGroup Drove Editor; this updates the LoginView'due south declarative markup to include a <RoleGroups> section with an <asp:RoleGroup> child chemical element for each RoleGroup defined in the RoleGroup Drove Editor. Furthermore, the "Views" drib-down list in the LoginView's Smart Tag - which initially listed just the AnonymousTemplate and LoggedInTemplate – now includes the added RoleGroups too.
Edit the RoleGroups so that users in the Supervisors role are displayed instructions on how to edit user accounts, while users in the Administrators part are shown instructions for editing and deleting. After making these changes, your LoginView's declarative markup should look similar to the post-obit.
<asp:LoginView ID="LoginView1" runat="server"> <RoleGroups> <asp:RoleGroup Roles="Administrators"> <ContentTemplate> As an Administrator, you may edit and delete user accounts. Remember: With corking power comes great responsibility! </ContentTemplate> </asp:RoleGroup> <asp:RoleGroup Roles="Supervisors"> <ContentTemplate> Every bit a Supervisor, you may edit users' E-mail and Comment information. Simply click the Edit button, make your changes, and then click Update. </ContentTemplate> </asp:RoleGroup> </RoleGroups> <LoggedInTemplate> You are not a member of the Supervisors or Administrators roles. Therefore you cannot edit or delete whatever user information. </LoggedInTemplate> <AnonymousTemplate> Y'all are non logged into the system. Therefore yous cannot edit or delete any user information. </AnonymousTemplate> </asp:LoginView> Afterwards making these changes, save the folio and then visit it through a browser. Showtime visit the page as an anonymous user. You should be shown the bulletin, "You are not logged into the arrangement. Therefore you cannot edit or delete any user information." Then log in equally an authenticated user, but one that is neither in the Supervisors nor Administrators function. This fourth dimension yous should see the bulletin, "Y'all are not a member of the Supervisors or Administrators roles. Therefore you cannot edit or delete any user information."
Next, log in as a user who is a member of the Supervisors part. This fourth dimension you lot should encounter the Supervisors part-specific bulletin (see Figure 9). And if you log in as a user in the Administrators role you should see the Administrators role-specific message (come across Figure 10).
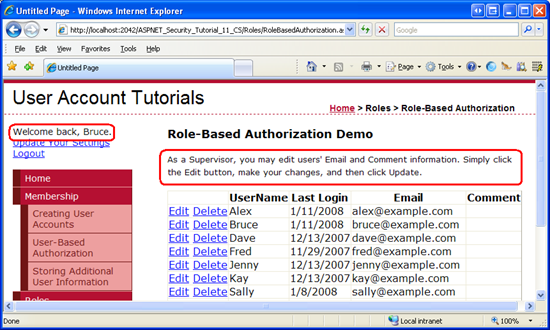
Effigy ix: Bruce is Shown the Supervisors Part-Specific Message (Click to view full-size image)

Effigy 10: Tito is Shown the Administrators Role-Specific Message (Click to view full-size image)
As the screen shots in Figures nine and ten evidence, the LoginView only renders i template, even if multiple templates apply. Bruce and Tito are both logged in users, still the LoginView renders merely the matching RoleGroup and not the LoggedInTemplate. Moreover, Tito belongs to both the Administrators and Supervisors roles, yet the LoginView control renders the Administrators office-specific template instead of the Supervisors one.
Figure xi illustrates the workflow used past the LoginView control to determine what template to render. Annotation that if there is more than ane RoleGroup specified, the LoginView template renders the commencement RoleGroup that matches. In other words, if we had placed the Supervisors RoleGroup as the first RoleGroup and the Administrators as the second, then when Tito visited this page he would see the Supervisors message.
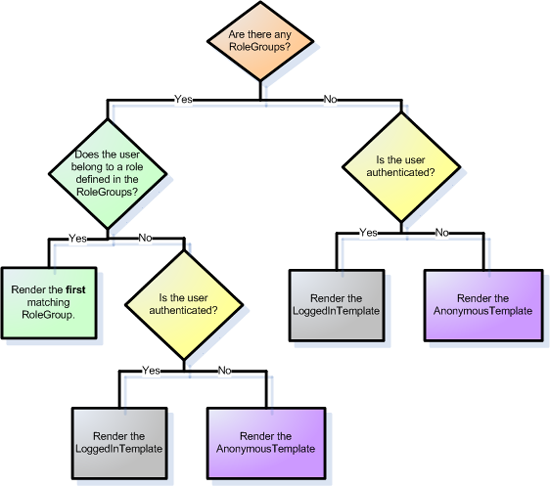
Figure eleven: The LoginView Control'due south Workflow for Determining What Template to Render (Click to view full-size image)
Programmatically Limiting Functionality
While the LoginView control displays unlike instructions based on the role of the user visiting the page, the Edit and Cancel buttons remain visible to all. Nosotros need to programmatically hide the Edit and Delete buttons for bearding visitors and users who are in neither the Supervisors nor Administrators role. We need to hide the Delete push button for everyone who is not an Administrator. In guild to reach this nosotros volition write a flake of code that programmatically references the CommandField's Edit and Delete LinkButtons and sets their Visible properties to imitation, if necessary.
The easiest way to programmatically reference controls in a CommandField is to offset convert it to a template. To attain this, click the "Edit Columns" link from the GridView's Smart Tag, select the CommandField from the list of current fields, and click the "Catechumen this field into a TemplateField" link. This turns the CommandField into a TemplateField with an ItemTemplate and EditItemTemplate. The ItemTemplate contains the Edit and Delete LinkButtons while the EditItemTemplate houses the Update and Cancel LinkButtons.
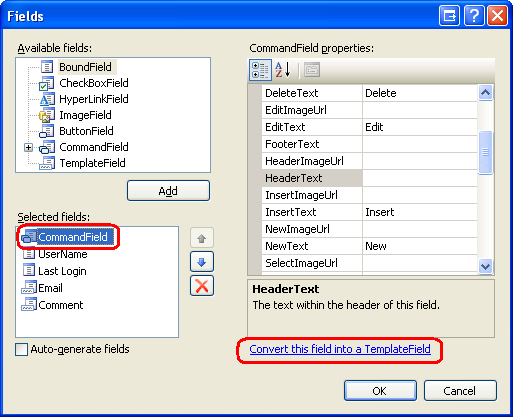
Figure 12: Convert the CommandField Into a TemplateField (Click to view total-size epitome)
Update the Edit and Delete LinkButtons in the ItemTemplate, setting their ID properties to values of EditButton and DeleteButton, respectively.
<asp:TemplateField ShowHeader="False"> <EditItemTemplate> <asp:LinkButton ID="LinkButton1" runat="server" CausesValidation="True" CommandName="Update" Text="Update"></asp:LinkButton> <asp:LinkButton ID="LinkButton2" runat="server" CausesValidation="False" CommandName="Cancel" Text="Cancel"></asp:LinkButton> </EditItemTemplate> <ItemTemplate> <asp:LinkButton ID="EditButton" runat="server" CausesValidation="False" CommandName="Edit" Text="Edit"></asp:LinkButton> <asp:LinkButton ID="DeleteButton" runat="server" CausesValidation="False" CommandName="Delete" Text="Delete"></asp:LinkButton> </ItemTemplate> </asp:TemplateField> Whenever data is bound to the GridView, the GridView enumerates the records in its DataSource property and generates a corresponding GridViewRow object. Equally each GridViewRow object is created, the RowCreated outcome is fired. In order to hibernate the Edit and Delete buttons for unauthorized users, nosotros demand to create an event handler for this event and programmatically reference the Edit and Delete LinkButtons, setting their Visible properties accordingly.
Create an consequence handler the RowCreated event and then add the following lawmaking:
protected void UserGrid_RowCreated(object sender, GridViewRowEventArgs east) { if (e.Row.RowType == DataControlRowType.DataRow && e.Row.RowIndex != UserGrid.EditIndex) { // Programmatically reference the Edit and Delete LinkButtons LinkButton EditButton = eastward.Row.FindControl("EditButton") as LinkButton; LinkButton DeleteButton = e.Row.FindControl("DeleteButton") as LinkButton; EditButton.Visible = (User.IsInRole("Administrators") || User.IsInRole("Supervisors")); DeleteButton.Visible = User.IsInRole("Administrators"); } } Keep in mind that the RowCreated result fires for all of the GridView rows, including the header, the footer, the pager interface, and so forth. We just want to programmatically reference the Edit and Delete LinkButtons if we are dealing with a information row not in edit mode (since the row in edit style has Update and Cancel buttons instead of Edit and Delete). This check is handled by the if statement.
If nosotros are dealing with a data row that is not in edit mode, the Edit and Delete LinkButtons are referenced and their Visible properties are set based on the Boolean values returned past the User object's IsInRole(roleName) method. The User object references the principal created by the RoleManagerModule; consequently, the IsInRole(roleName) method uses the Roles API to determine whether the current company belongs to roleName.
Note
We could accept used the Roles class direct, replacing the telephone call to User.IsInRole(roleName) with a call to the Roles.IsUserInRole(roleName) method. I decided to apply the principal object's IsInRole(roleName) method in this case because it is more efficient than using the Roles API directly. Earlier in this tutorial nosotros configured the role manager to enshroud the user'southward roles in a cookie. This cached cookie data is only utilized when the principal's IsInRole(roleName) method is called; directly calls to the Roles API always involve a trip to the role store. Even if roles are non buried in a cookie, calling the main object's IsInRole(roleName) method is usually more than efficient because when information technology is called for the offset fourth dimension during a request it caches the results. The Roles API, on the other paw, does not perform whatever caching. Because the RowCreated outcome is fired in one case for every row in the GridView, using User.IsInRole(roleName) involves just one trip to the office shop whereas Roles.IsUserInRole(roleName) requires Due north trips, where N is the number of user accounts displayed in the grid.
The Edit button's Visible property is set up to true if the user visiting this page is in the Administrators or Supervisors role; otherwise it is set to imitation. The Delete button's Visible property is set to truthful only if the user is in the Administrators role.
Exam this page through a browser. If you visit the folio as an anonymous visitor or as a user that is neither a Supervisor nor an Administrator, the CommandField is empty; information technology still exists, simply equally a thin sliver without the Edit or Delete buttons.
Annotation
It is possible to hide the CommandField altogether when a non-Supervisor and non-Administrator is visiting the page. I leave this as an exercise for the reader.
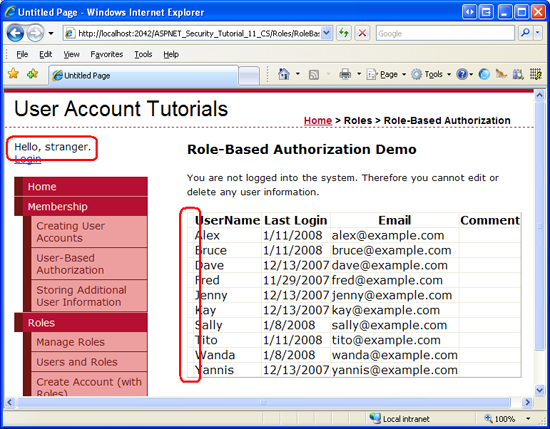
Figure thirteen: The Edit and Delete Buttons are Hidden for Non-Supervisors and Non-Administrators (Click to view full-size prototype)
If a user that belongs to the Supervisors role (but not to the Administrators role) visits, he sees only the Edit push button.

Figure 14: While the Edit Push is Available for Supervisors, the Delete Button is Hidden (Click to view full-size image)
And if an Administrator visits, she has admission to both the Edit and Delete buttons.

Figure 15: The Edit and Delete Buttons are Available Simply for Administrators (Click to view full-size image)
Step 3: Applying Role-Based Authorization Rules to Classes and Methods
In Pace two we limited edit capabilities to users in the Supervisors and Administrators roles and delete capabilities to Administrators only. This was accomplished by hiding the associated user interface elements for unauthorized users through programmatic techniques. Such measures do not guarantee that an unauthorized user will be unable to perform a privileged action. There may be user interface elements that are added later or that we forgot to hide for unauthorized users. Or a hacker may discover some other way to get the ASP.Internet page to execute the desired method.
An easy fashion to ensure that a particular slice of functionality cannot be accessed by an unauthorized user is to decorate that class or method with the PrincipalPermission aspect. When the .Cyberspace runtime uses a course or executes one of its methods, it checks to ensure that the electric current security context has permission. The PrincipalPermission attribute provides a mechanism through which we can ascertain these rules.
We looked at using the PrincipalPermission attribute back in the User-Based Authorization tutorial. Specifically, we saw how to decorate the GridView'due south SelectedIndexChanged and RowDeleting result handler so that they could only exist executed past authenticated users and Tito, respectively. The PrincipalPermission aspect works just as well with roles.
Let's demonstrate using the PrincipalPermission aspect on the GridView's RowUpdating and RowDeleting event handlers to prohibit execution for non-authorized users. All nosotros need to do is add the appropriate attribute atop each part definition:
[PrincipalPermission(SecurityAction.Demand, Office = "Administrators")] [PrincipalPermission(SecurityAction.Need, Part = "Supervisors")] protected void UserGrid_RowUpdating(object sender, GridViewUpdateEventArgs e) { ... } [PrincipalPermission(SecurityAction.Demand, Role = "Administrators")] protected void UserGrid_RowDeleting(object sender, GridViewDeleteEventArgs eastward) { ... } The attribute for the RowUpdating result handler dictates that only users in the Administrators or Supervisors roles can execute the effect handler, where as the attribute on the RowDeleting event handler limits the execution to users in the Administrators role.
Notation
The PrincipalPermission attribute is represented every bit a course in the System.Security.Permissions namespace. Exist certain to add together a using System.Security.Permissions argument at the tiptop of your code-behind class file to import this namespace.
If, somehow, a non-Ambassador attempts to execute the RowDeleting outcome handler or if a non-Supervisor or non-Administrator attempts to execute the RowUpdating result handler, the .Internet runtime will heighten a SecurityException.
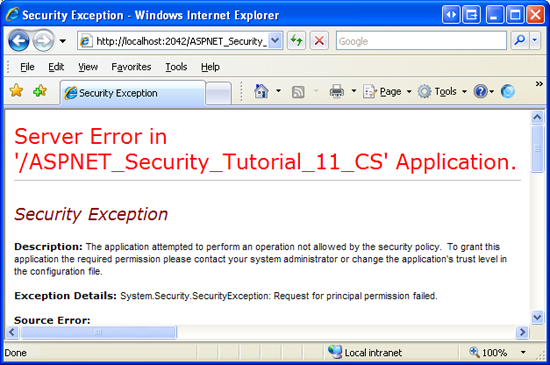
Figure 16: If the Security Context is non Authorized to Execute the Method, a SecurityException is Thrown (Click to view total-size image)
In addition to ASP.Net pages, many applications also accept an architecture that includes various layers, such as Business Logic and Data Access Layers. These layers are typically implemented equally Grade Libraries and offer classes and methods for performing business organisation logic- and data-related functionality. The PrincipalPermission attribute is useful for applying authorization rules to these layers as well.
For more information on using the PrincipalPermission attribute to define authorization rules on classes and methods, refer to Scott Guthrie's web log entry Adding Authorization Rules to Concern and Data Layers Using PrincipalPermissionAttributes.
Summary
In this tutorial we looked at how to specify coarse and fine grain dominance rules based on the user's roles. ASP.NET'southward URL potency feature allows a page programmer to specify what identities are allowed or denied access to what pages. Equally we saw back in the User-Based Potency tutorial, URL say-so rules can exist practical on a user-by-user basis. They can also exist applied on a office-by-office basis, as we saw in Step 1 of this tutorial.
Fine grain authorization rules may be applied declaratively or programmatically. In Pace 2 we looked at using the LoginView command's RoleGroups feature to return different output based on the visiting user's roles. We too looked at ways to programmatically make up one's mind if a user belongs to a specific role and how to adjust the folio's functionality appropriately.
Happy Programming!
Further Reading
For more information on the topics discussed in this tutorial, refer to the post-obit resource:
- Calculation Authorization Rules to Business and Data Layers Using
PrincipalPermissionAttributes - Examining ASP.NET ii.0's Membership, Roles, and Profile: Working with Roles
- Security Question Listing for ASP.Internet 2.0
- Technical documentation for the
<roleManager>Element
Almost the Writer
Scott Mitchell, author of multiple ASP/ASP.Cyberspace books and founder of 4GuysFromRolla.com, has been working with Microsoft Web technologies since 1998. Scott works as an independent consultant, trainer, and writer. His latest book is Sams Teach Yourself ASP.NET 2.0 in 24 Hours. Scott can be reached at mitchell@4guysfromrolla.com or via his weblog at http://ScottOnWriting.Cyberspace.
Special Cheers To…
This tutorial serial was reviewed by many helpful reviewers. Lead reviewers for this tutorial include Suchi Banerjee and Teresa Murphy. Interested in reviewing my upcoming MSDN manufactures? If so, drop me a line at mitchell@4GuysFromRolla.com
Source: https://docs.microsoft.com/en-us/aspnet/web-forms/overview/older-versions-security/roles/role-based-authorization-cs
Post a Comment for ".net Core Read Request Header for User Roles From Sso"